3.1 Overview
- int_artifi:Commerce Cloud storefront extension
3.1.1 SFRA Compilation
- Clone the Artifi Cartridges (int_artifi) repository. (Request access to this repository from Artifi.)
- Place the Artifi Cartridges (int_artifi) with Storefront Reference Architecture (SFRA) parallel to the cloned directory (e.g., download from https://github.com/SalesforceCommerceCloud/storefront-reference-architecture).
- Ensure your Node.js version is 18.19.1.
- Navigate to SFRA (storefront-reference-architecture) directory:
- npm install
- npm run compile:js
- npm run compile:scss
- Go back to the root directory and run the following commands:
- Update base of paths in package.json if needed.
- npm install
- npm run compile:js
- npm run compile:scss
3.2 Installation
3.2.1 Add Cartridge to Cartridge Path - SFRA
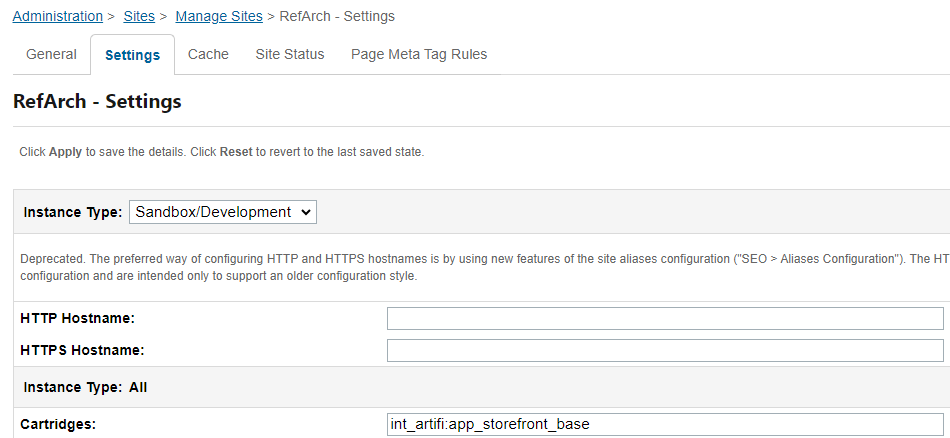
- Go to Business Manager > Administration > Sites > Manage Sites > Your Site > Settings.
- Add cartridges in the following order for the SFRA site:
- int_artifi:app_storefront_base
3.2.2 Import Metadata Archive
- Upload and import metadata.zip from the int_artifi cartridge structure.
- Go to Business Manager > Administration > Site Development > Site Import & Export.
- Upload the archive using the Local option in the Upload Archive section.
- After uploading, select the <metadata file name>.zip in the list and click on the Import button.

3.3 Metadata
The integration requires System Objects Extension to store partner-related information.
3.3.1 Custom Attributes for Product Object
This can be confirgured at: Merchant Tools > Products and Catalogs > Products > (any product) - General
| Custom Attribute | Data Type | Description | Values |
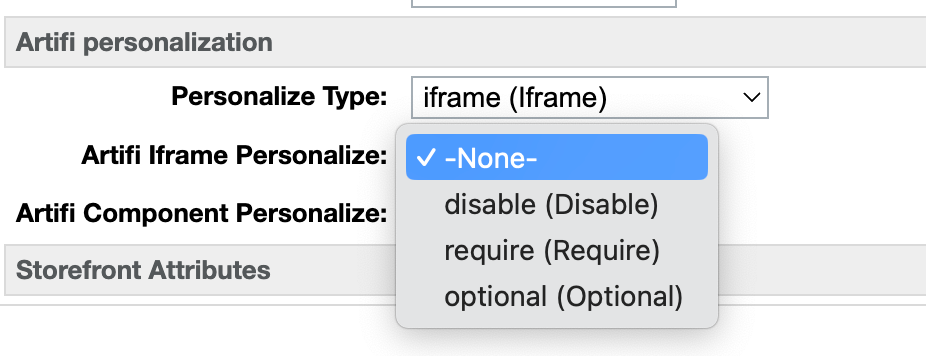
| Personalize Type (c_personalizeType) | Enum | Decides between Iframe or Component-based personalization approach. | iframe-Based: Personalization via Artifi-rendered Iframe. Component-Based: Personalization via Artifi components on the same page. None: Personalization is disabled. |
| Artifi Iframe Personalize (c_iframe_personalize) | Enum | Decides the personalization requirement for the Iframe approach. | Require: Product must be personalized before adding to cart. Optional: Personalization is optional; user can personalize or add to cart directly. Disable: Personalization is disabled; button is not visible on PDP. |
| Artifi Component Personalize (c_component_personalize) | Enum | Decides the personalization requirement for the Component approach. | Require: Product must be personalized; error shown if user doesn't customize. Optional: Customization is optional; user can customize or add to cart directly. |
| c_component_customize_price | JSON | Stores the price added to the base price for component-type personalization. | Merchant-defined price. Example Value: {"text":5,"image":5} |
| c_iframe_cust_price | Int | Stores the price added to the base price for iframe-type personalization. | Merchant-defined price. Example Value:5 |


3.3.2 Custom Attributes for Product Line Item Object
| Custom Attribute | Data Type | Description |
| Customized Product Details (customizedProductDetails) | String/Text | Stores the customized product details retrieved from Artifi upon 'add to cart'. |
| Artifi Attributes (c_artifiCustomAttributes) | JSON | Stores customization information in JSON format. |
The c_artifiCustomAttributes JSON stores the following:
- Design ID (DesignID): Unique design ID of the customized product.
- XML Link (XMLLink): XML link for the customized product.
- PDF Link (PDFLink): PDF link for the customized product.
- Approach Type (approachType): Personalization type (iframe or component).
- Custom Price (customPrice): Product customization charge.
3.3.3 Custom Preferences
These preferences are used to set values globally. If a product has no specific configuration, these global values are considered. This can be configured at Merchant Tools > Site Preferences > Custom Preferences > ArtifiPersonalization.
| Custom Preference | Data Type | Description |
| Instance Type (c_instanceType) | Enum | Selects the environment mode (development or production). |
| Web Api Client Key (c_webApiclientKey) | String | Stores the Web API client key (found on the Artifi portal). |
| Website ID (c_websiteId) | String | Stores the Website ID (found on the Artifi portal). |
| Enable Reorder (c_enableReorder) | Boolean | Global setting to enable/disable the Reorder Button. |
| XML Path (c_xmlPath) | String | Constant path for generating the XML link (provided by Artifi). |
| PDF Path (c_pdfPath) | String | Constant path for generating the PDF link (provided by Artifi). |
| Iframe Customize Price (c_iframe_cust_price) | Int | Global price for iframe-type personalization (added to the base price). Example Value:5 |
| Component Customize Price (c_component_customize_price) | JSON | Global price for component-type personalization (added to the base price). Example Value: {"text":5,"image":5} |
The following product attributes can be set globally via Custom Preferences:
- Artifi personalize type
- Artifi Iframe Personalize
- Artifi Component Personalize

3.3.4 Basket Preference
Set the "Allow Repeat" option to treat every customized line item differently.
- Go to Merchant Tools > Site Preferences > Baskets.
- Set the Allow Repeat option.
3.4 Adding API Credentials
Services connect the Artifi portal to the SFCC sandbox. First, service credentials and a service API profile must be created.
3.4.1 Services in BM
| Service Name | Purpose | Artifi API Calls |
| ArtifiApiService | For general Artifi API calls. | Delete: Removes the product from the Artifi side when a product is removed from the cart. |
| ArtifiApiService | UpdateCustomizedProduct: Called after a successful order placement to update the Artifi order status. | |
| ArtifiReorderApiService | For reorder functionality using the iframe approach. | Helps create a new Product Line Item (PLI) in the cart with the same customization but a different Design ID. |
| UpdateUserId | Called when a customer logs in to the storefront. | Updates the user ID on the Artifi side. |
| ComponentReorderService | For reorder functionality using the component approach. | Helps create a new PLI in the cart with the same customization but a different Design ID. |
3.4.2 Credentials

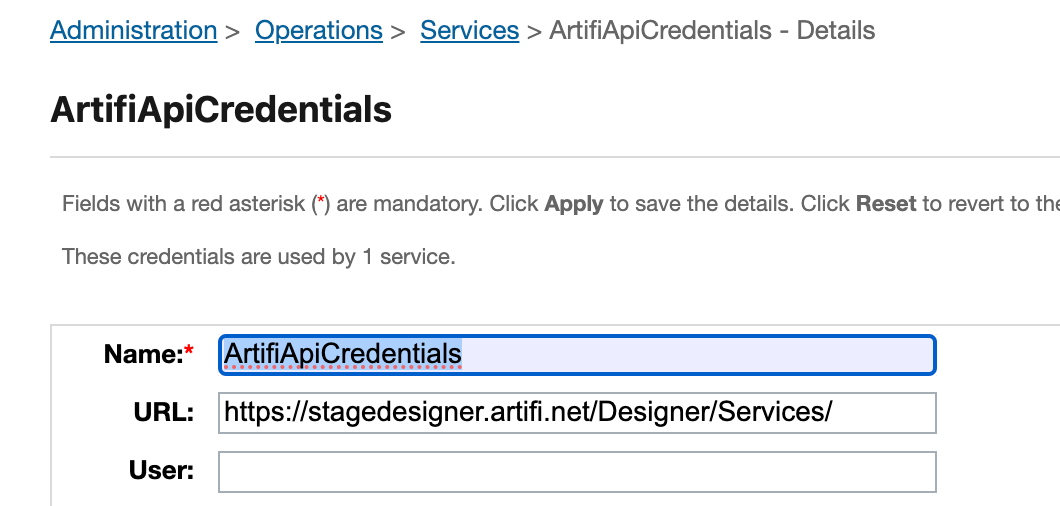
- Go to Business Manager > Administration > Operations > Services > Credentials.
- Click on ArtifiApiCredentials or ArtifiReorderComponentService (for reorder component).
- Recommendation: Enable the communication log for the service to log every request and response.
- Navigate to Business Manager > Administration > Operations > Services.
- Click on ArtifiApiService.
- Check the Communication Log Enabled checkbox.
3.5 Configuration
3.5.1 Whitelisting the Domain on the Artifi Dashboard
For security reasons, the storefront domain must be whitelisted.
- Navigate to "https://admin.artifi.net/" and log in using the credentials provided by the Artifi team.
- In the dashboard, click on the Admin tab, then click on Website in the drop-down menu.
- Click on the Add New button at the top right corner.
- A form will open; enter the details of your storefront. For multiple subdomains, use the Add More button.

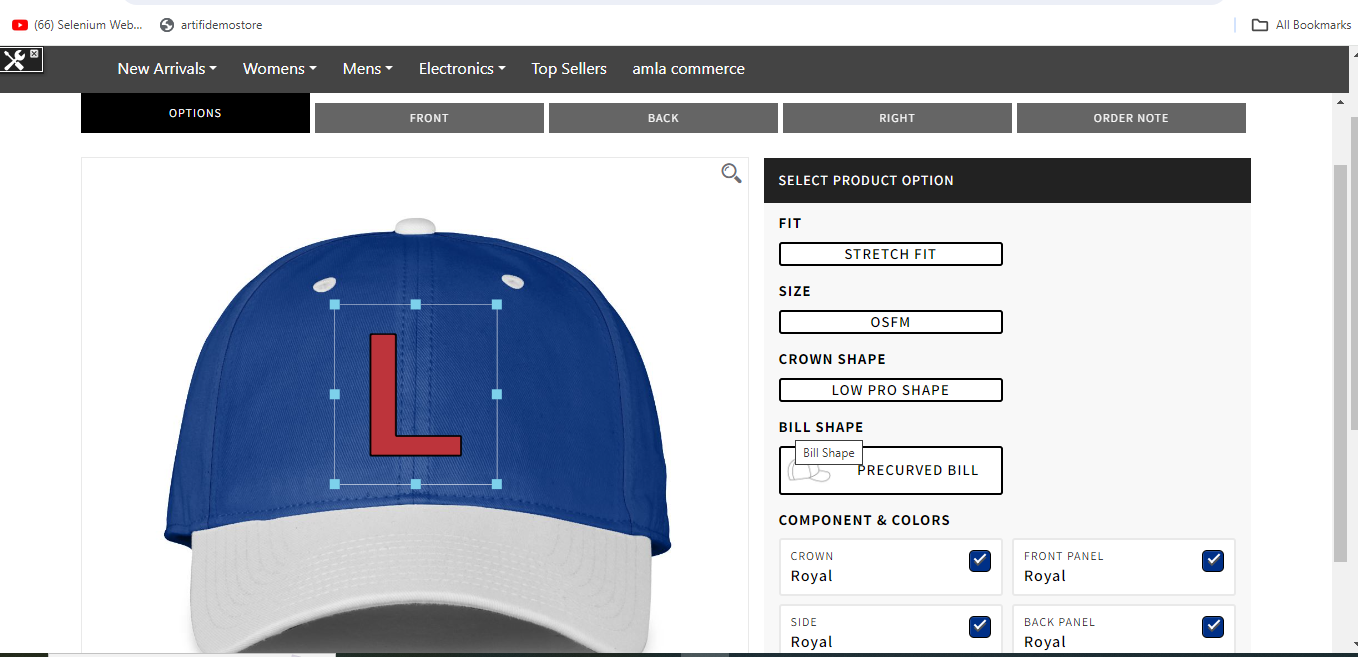
3.5.2 Customizing a Product: iFrame
Customization can be implemented in two steps:
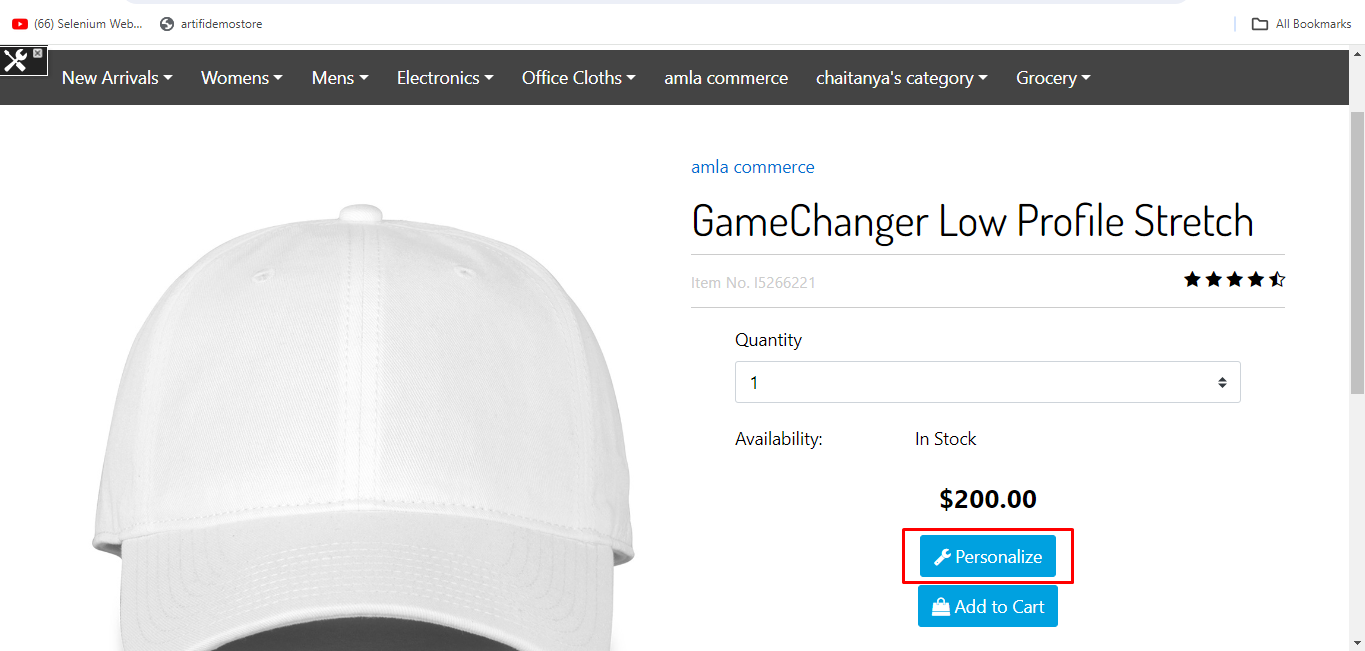
- Open the Product detail page (PDP).
- Click on the Personalize button.
Personalization
The visibility of the 'Add to cart' and 'Personalization' buttons is controlled by the personalization setting.

At Product Level:
| c_iframe_personalize Value | Button Visibility |
| Optional | Both 'Add to cart' and 'Personalization' buttons are present. |
| Require | Only the 'Personalization' button is present. |
| Disable | Only the 'Add to cart' button is present (Personalization is disabled). |
At Global Level:
- Go to Merchant Tools > Site Preferences > Custom Preferences > ArtifiPersonalization.
- Select IFrame (iframe) in Artifi personalize type.
- Select a value from Optional, Require, or Disable.
- Save the settings.


Preview
For customized products, a preview option is available before checkout. Users can click this to view their personalized product.


Edit button
An option to edit the customized product is available. Clicking the Edit button redirects the user to the product page with the current customization applied, allowing them to make changes.
- An edit button is visible next to a customized product (e.g., in the cart).
- After clicking the edit button, the edit page opens up with the current customization.

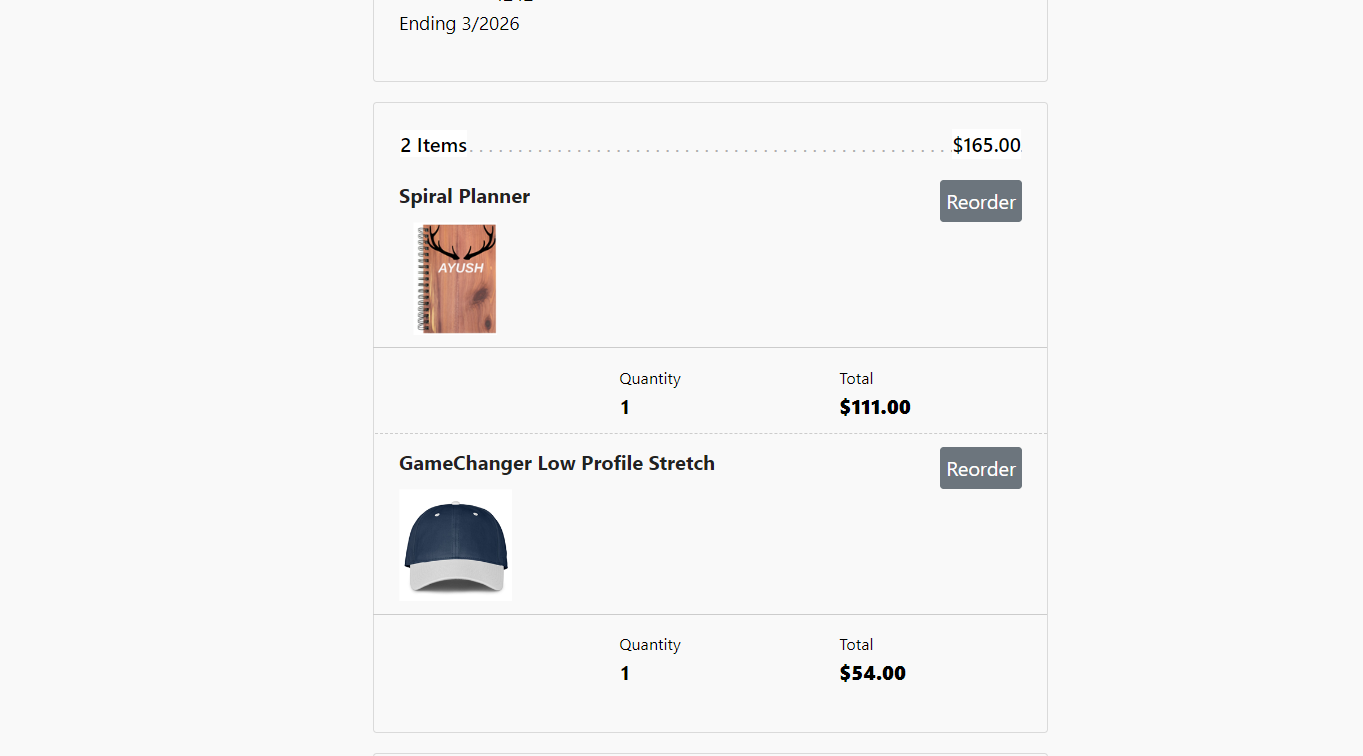
Reorder Button
- This option is available for logged-in users.
- On the order confirmation page, navigate to My Orders via the dropdown.
- You can view past orders and select the item to reorder, which will be added to the cart with the same customization.
3.5.3 Customizing a Product: Component
When using the component-based approach, users can customize the product directly on the PDP.
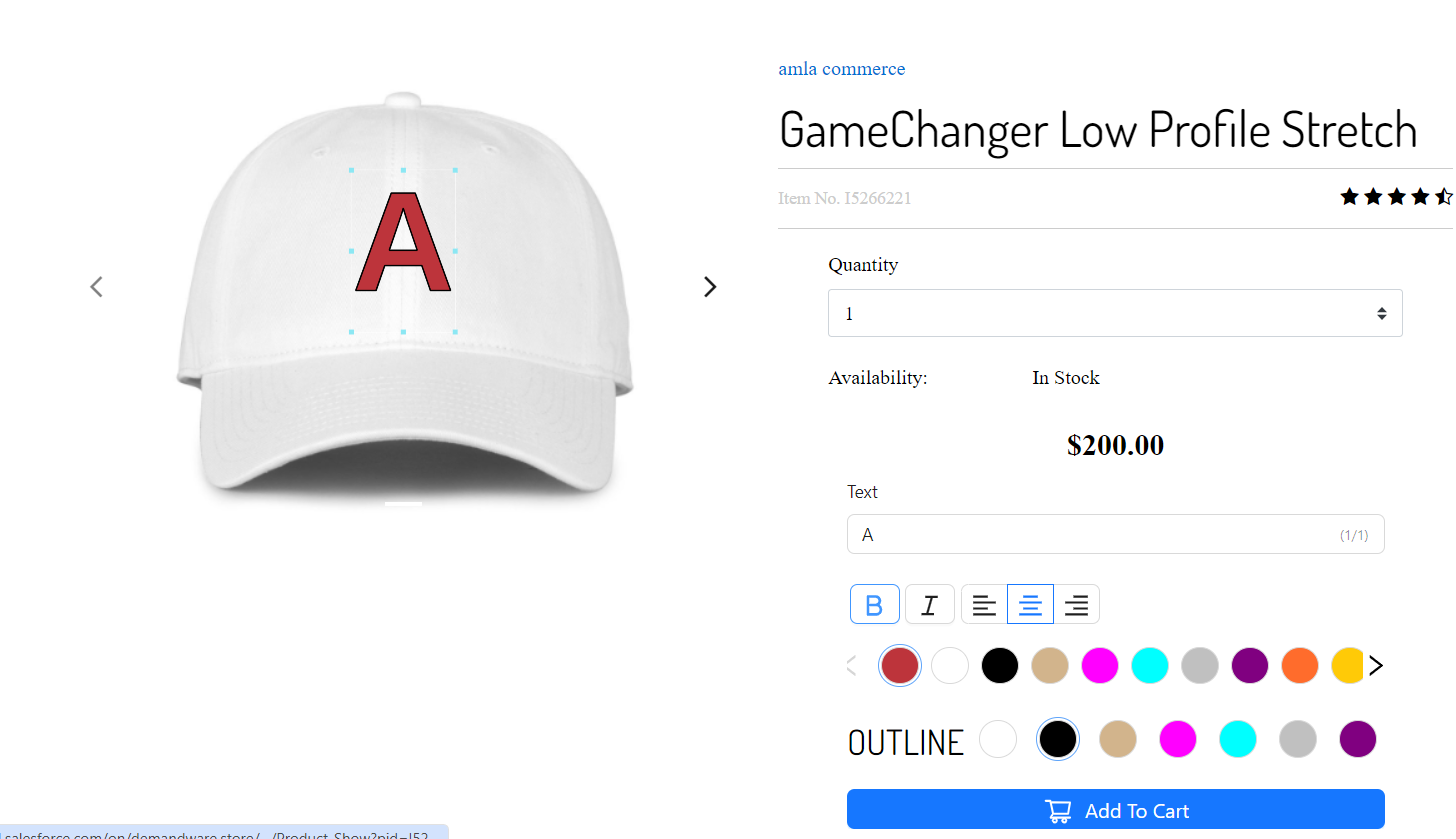
To enable component-based personalization, it must be configured in Business Manager.
1. Product Level

The configuration is done using the custom attributes detailed in section 4.3.1.
2. Global Level
- Go to Merchant Tools > Site Preferences > Custom Preferences > ArtifiPersonalization.
- Select Component in Artifi personalize type.
- Select a value from Optional or Require.
- Save the settings.


After configuration, users can go to the PDP, customize the product using the components, and add it to the cart to complete their customer journey.
Preview
For customized products, a preview option is available before checkout. Users can click this to view their personalized product.

Edit Button
An option to edit the customized product is available. Clicking the Edit button redirects the user to the product page with the current customization applied, allowing them to make changes.

- An edit button is visible next to a customized product (e.g., in the cart) after clicking 'add to cart'.
- After clicking the edit button, the user can make changes to that customized product.


Reorder Button
- This option is available for logged-in users.
- On the order confirmation page, navigate to My Orders via the dropdown.
- You can view past orders and select the item to reorder, which will be added to the cart with the same customization.
